To open up your site to public registration (or registration from specified domains), you’ll need to do two things: (1) adjust a WP setting and (2) create “Register” and “Activation” pages. The process is pretty straightforward, but some annoying spam issues that might occur. The following shows how to configure registration, and suggests some plugins that will help filter out, or at least deal with unwanted registrations and spam.
Opening Up Registration
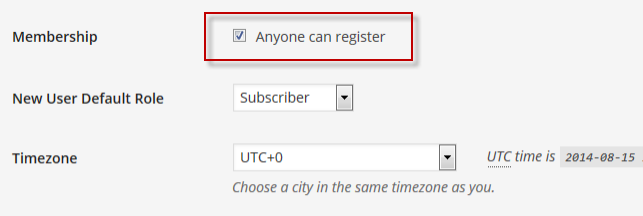
To open up your site to new registrations, go to Settings>General in the WordPress admin and make sure you have “anyone can register” checked. See image below:

If you’re using WordPress in network mode (multisite), login to the WP admin area, navigate to “Super Admin > Options”, and under “Allow new registrations”, select any option but “Disabled”.
Setting up Register and Activation Pages
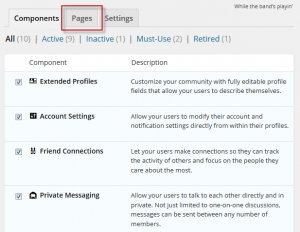
Once you have set your site’s registration to public, you will need to set up two pages – one for registration and the other for activation. Go to Settings > BuddyPress. You should see a page similar to the one on the right.
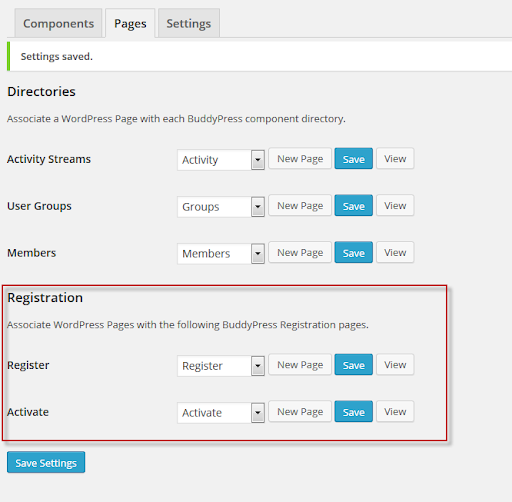
Click on “Pages” to set up your registration pages. If you want, you can create the pages before, or you can use the dialog available here. You can name the pages anyway you like, but they should just be blank pages, and associated with the “Register” and “Activate” attributes shown below:

Understanding the Registration Process
Now that you are have opened up your site to registration, you have enabled what is probably a very familiar scenario – a potential member clicks on a registration button, enters a user name, an email address, a password, and some profile information and soon receives a confirmation email, with a link to activate the new account. Once the activation link from the email is clicked, the new user will re-enter the password, and membership is established. Typically the new user will be assigned a “Subscriber” role, but you can adjust if wanted (though you should be very careful with this setting).
Registration Buttons
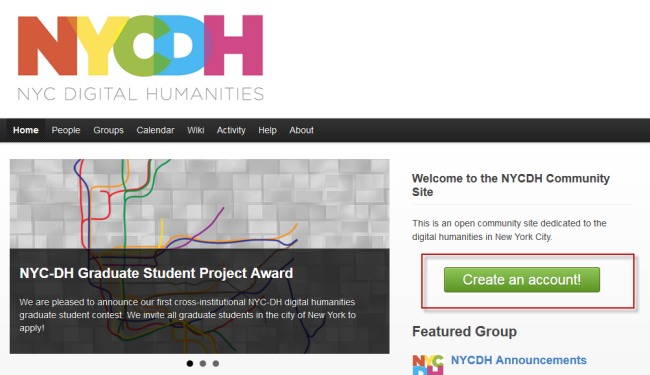
By default, the registration buttons are located on the admin bar at the very top of your site. You might want to make registration a little clearer by using a text widget that includes some explanatory text about your site and invites new membership. If you choose this option, you can hyperlink to your “Register” page, or with a little effort, create a button in HTML that makes registration option even more apparent. CBOX theme users often use the homepage widget area called “HomePage Top Right” to place a Welcome message and registration button. See an example in the screenshot below:

Strategies For Filtering Out Unwanted Members
On sites with fully open registration, spammers often register, become members and start posting unwanted content on your site.
An effective strategy for reducing spam registrations, for many sites, is to allow registration only by users with email addresses that match a certain whitelist of email domains (for example, a college email like @example.edu). There are several ways to configure limited email domain registrations, depending on your Commons In A Box configuration:
- If you’re running the OpenLab package, visit Dashboard > CBOX: OpenLab > Member Settings > Registration to add emails to the whitelist. You can add full email domains (example.edu), subdomains (students.example.edu), or domains that use wildcards (*.example.edu).
- Classic installations that are running WordPress Multisite can manage the email domain whitelist at Network Admin > Settings > Registration Settings; look for “Limited Email Registrations”.
- Other CBOX sites may use the flexible BP Restrict Signup By Email Domain plugin to restrict registration based on email address. (It also has a manual way around this requirement for exceptions.) The plugin is very configurable for cases in which, for example, you might only want to allow emails that end in .edu or .org.
If your site is open to public registration, you will need to keep on top of new content posting, and mark it as spam when appropriate. You can go to Activity on your dashboard to see the most recent postings, and monitor new postings. You can also mark the member as spam, or delete the member from your site. You also might want to install one of the plugins listed below.
Helpful Plugins
Akismet – your first line of defense against spam. Set up an account and keep it updated. You’ll be happy you did!
Adminimize – this plugin lets you configure your site’s admin bar (See also this CBOX support forum thread which might be helpful.)
Wanguard – this is a very popular plugin among CBOX users. It describes itself as the “most advanced protection against sploggers and spam user registration…”
WordFence – another popular plugin that keeps your site secure, updated, and can configure registration options. It provides “real-time distributed protection as it learns from other sites that are attacked.” Free and Premium versions are available.
BP Restrict Signup By Email Domain – Developed by CBOX dev team member Ray Hoh, this plugin restricts registration to types of domains. Great for academic sites.

